Our 9-hole course that can be played without a DGV license
About the Eifel Course
Golf for beginners and returning players
Our 9-hole Eifel Course is perfect for anyone who wants to get to know golf or return to the sport after a break. You can play here without a playing certificate—as long as you have already taken a trial course.
The course consists of varied par 3 and par 4 holes and offers the perfect environment to try golf at your own pace. It is compact and ideal for practicing and enjoying the game—without any pressure or hurry.
If you want to take it further, you can continue directly with a playing certificate course. This will prepare you for all golf courses—step by step, with professional guidance and plenty of practice.
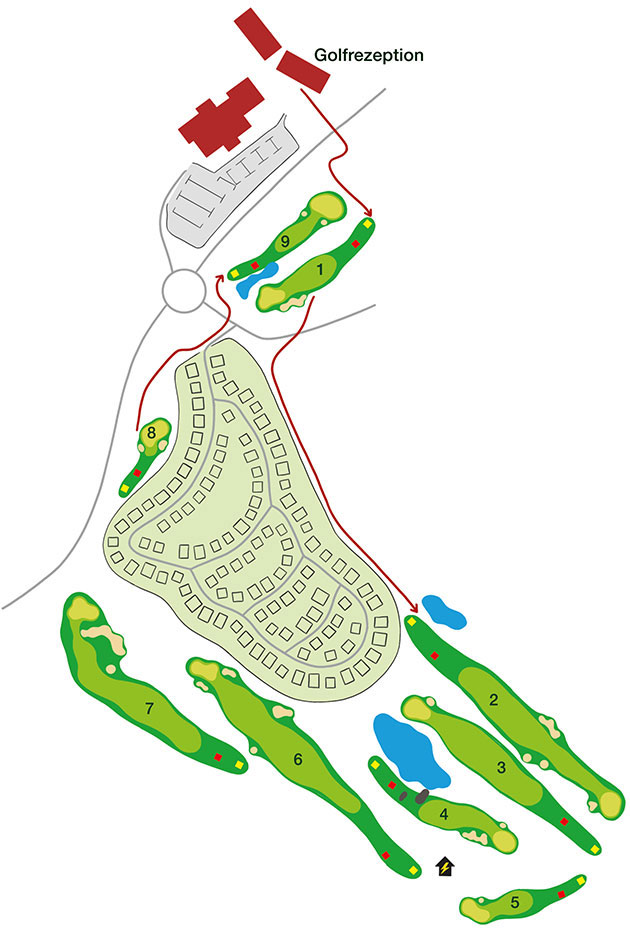
Tracks in detail
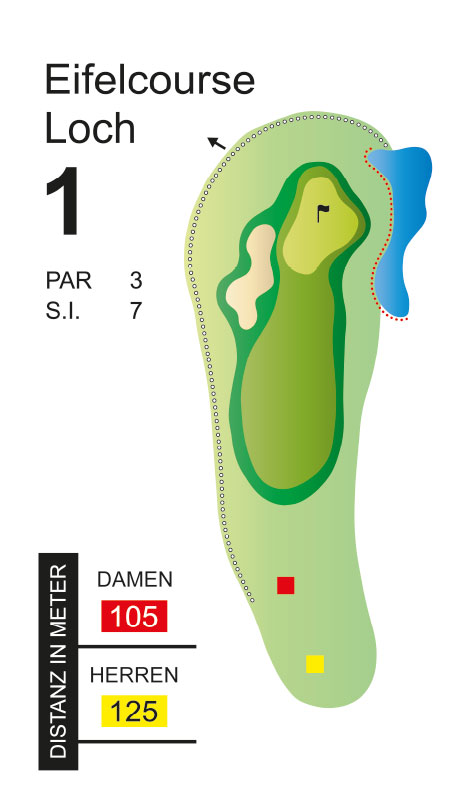
Hole 1: A Relaxed Start—But Not Too Relaxed
The course starts with a slight downhill slope. This makes the first hole seem easier at first than it actually is.
Bunkers and out-of-bounds areas lie to the left, while water comes into play on the right. If you try to force as much distance as possible right off the bat, you could quickly find yourself facing a difficult second shot.
A calm, clean swing is better. The slight slope helps the ball—and under the right conditions, it’ll roll quite a bit.
Game plan: Control your swing, avoid hazards, and get the ball onto the green with finesse.
First impressions can be deceiving: The Eifel Course means business.
Hole 2: Aim High
The shot goes straight toward the green—seemingly a straightforward task. But small bunkers on the right and left narrow the path more than it initially appears.
The green deserves special attention. It’s fast and slopes toward the out-of-bounds area. That’s why not only the distance but, above all, the height of the shot is crucial here.
A high ball lands softer and is more likely to stay where you want it to.
Game plan: Better to hit it high and controlled than flat with too much roll.
If you hit the green, you’ve already done a lot right.

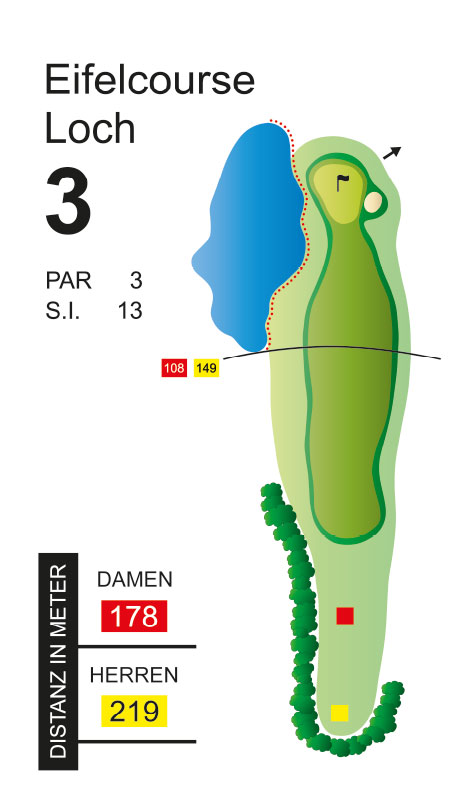
Hole 3: Par Is Within Reach
At first glance, Hole 3 looks like an easy challenge. But this is exactly where the typical Eifel Course trap lurks: water on the left, a bunker on the right side of the green.
If you don’t let that intimidate you and hit a precise shot, you’ll be rewarded. Par is definitely within reach on this hole.
The trick is to be aware of the hazards without letting them intimidate you.
Game plan: Pick your target, swing calmly, and stop thinking about the hazards as soon as the ball is in flight.
Sometimes, a par is just a matter of confidence.
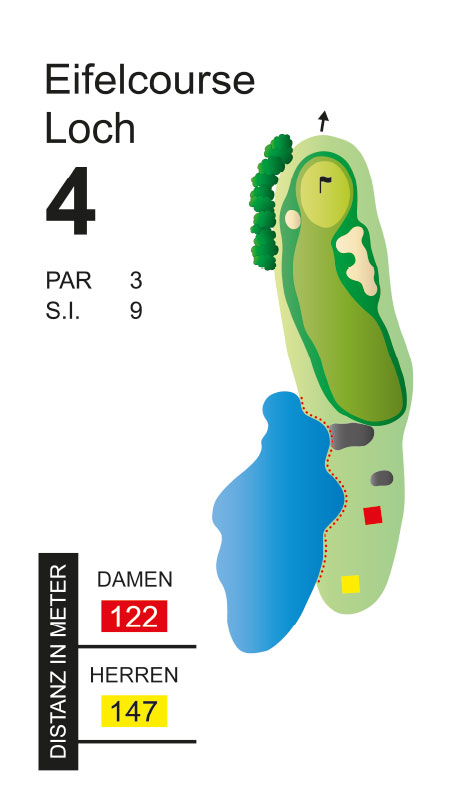
Hole 4: The Courage to Decide
Now it gets strategic.
Woods, water, and bunkers really shake things up. Here, you should decide which approach to take even before you swing.
Go for it directly? Or play it safe and then continue with a precise chip shot?
Both approaches can work. The key is your own driving distance—and, above all, an honest assessment of what you can truly execute with confidence on this particular day.
Game plan: Choose not the most spectacular shot, but the best one.
Good golf often starts with a good decision.
Hole 5 Short Doesn’t Always Mean Easy
A short hole, and downhill to boot—it sounds like an invitation to shoot par.
But beyond the fast green lies the out-of-bounds area. If you hit the ball too far, you’ll quickly be penalized for what was actually a good shot.
That’s why, in this case, less is often more. A controlled approach shot will get the ball closer to the flag than a reckless attack.
Game plan: Factor in the speed of the green and the out-of-bounds area behind the green when planning your shot distance.
The green is the goal—not the flag at any cost.

Hole 6: Clear Fairway—Or Is It?
There’s plenty of space ahead. The fairway practically invites you to take your tee shot.
Even the bunkers in front of and beside the green don’t look particularly threatening at first glance. It’s actually a perfect opportunity for a relaxed, well-executed golf shot.
Actually.
Because an imprecise shot can suddenly make this supposedly easy hole much more difficult.
Game plan: Take advantage of the course, but don’t underestimate it. A clean tee shot opens up all possibilities.
Sometimes the difficulty begins exactly where you least expect it.

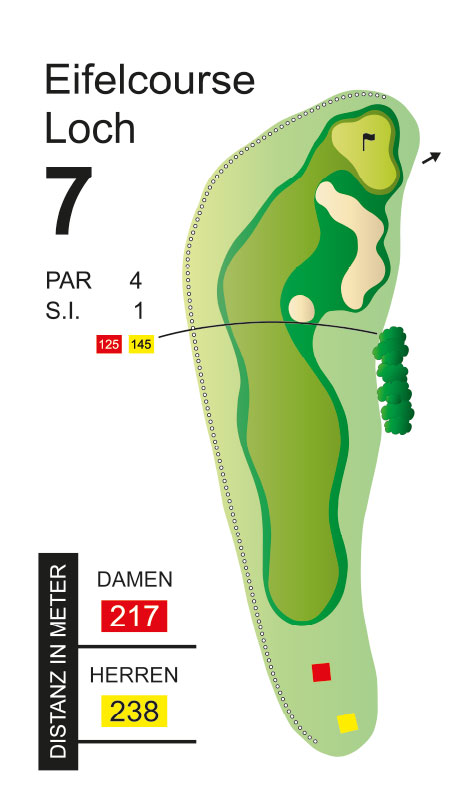
Hole 7: Attack or Play It Safe?
This is where strategies diverge.
If you have plenty of distance, you can attack the green directly. The safer option, on the other hand, is to play to the front of the bunker. From there, you can easily reach the large green with your second shot.
Two paths, one goal—and an interesting question: How much risk is your par worth?
Game Strategy: Let your shot distance and the day’s form decide. The bold approach isn’t automatically the better one.
Golf is also the art of knowing when to attack—and when not to.
Hole 8: Short but tricky
The shortest hole on the Eifel Course.
And that’s exactly why it’s a hole that’s easy to underestimate.
This hole doesn’t require brute force, but rather a feel for the shot. If you judge the distance accurately and place the ball on the green with precision, you’ll have the best chance of making a solid par.
On the other hand, if you think, “It’s just a short shot,” you might be in for a surprise.
Game strategy: Prioritize club selection and feel over ego and distance.
Sometimes, short is the most challenging distance.

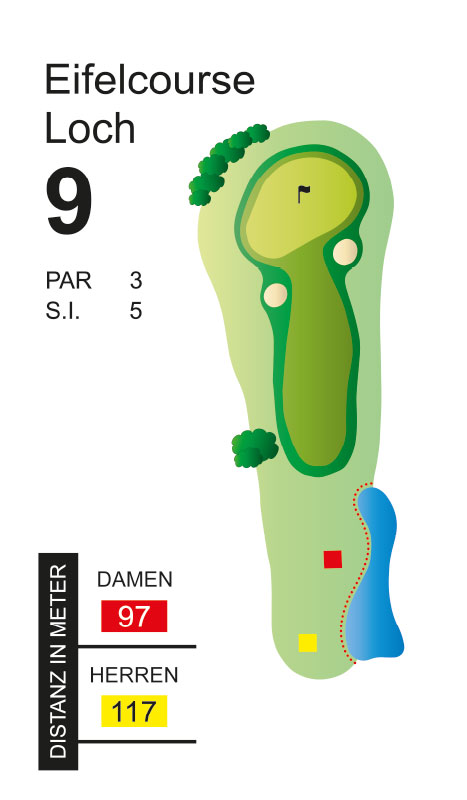
Course 9: A Challenging Finale
Almost there. But only almost.
To finish off, there’s one more hole that demands a good final shot. Be sure to factor in the bunkers in front of the green when planning your shot.
On the other hand, the large green offers plenty of room for a bold attack. But be careful when putting: the green is sloped. If you can get the ball to rest as close to the flag as possible, you’ll give yourself a much better chance on the final putt.
Game Strategy: Pay attention to the flag position, aim to land the ball below the hole, and finish the round in a controlled manner.
A strong finish is the best way to end a round.